
How to Restore a Wallbox Pulsar Charger Connection
2026-11-18

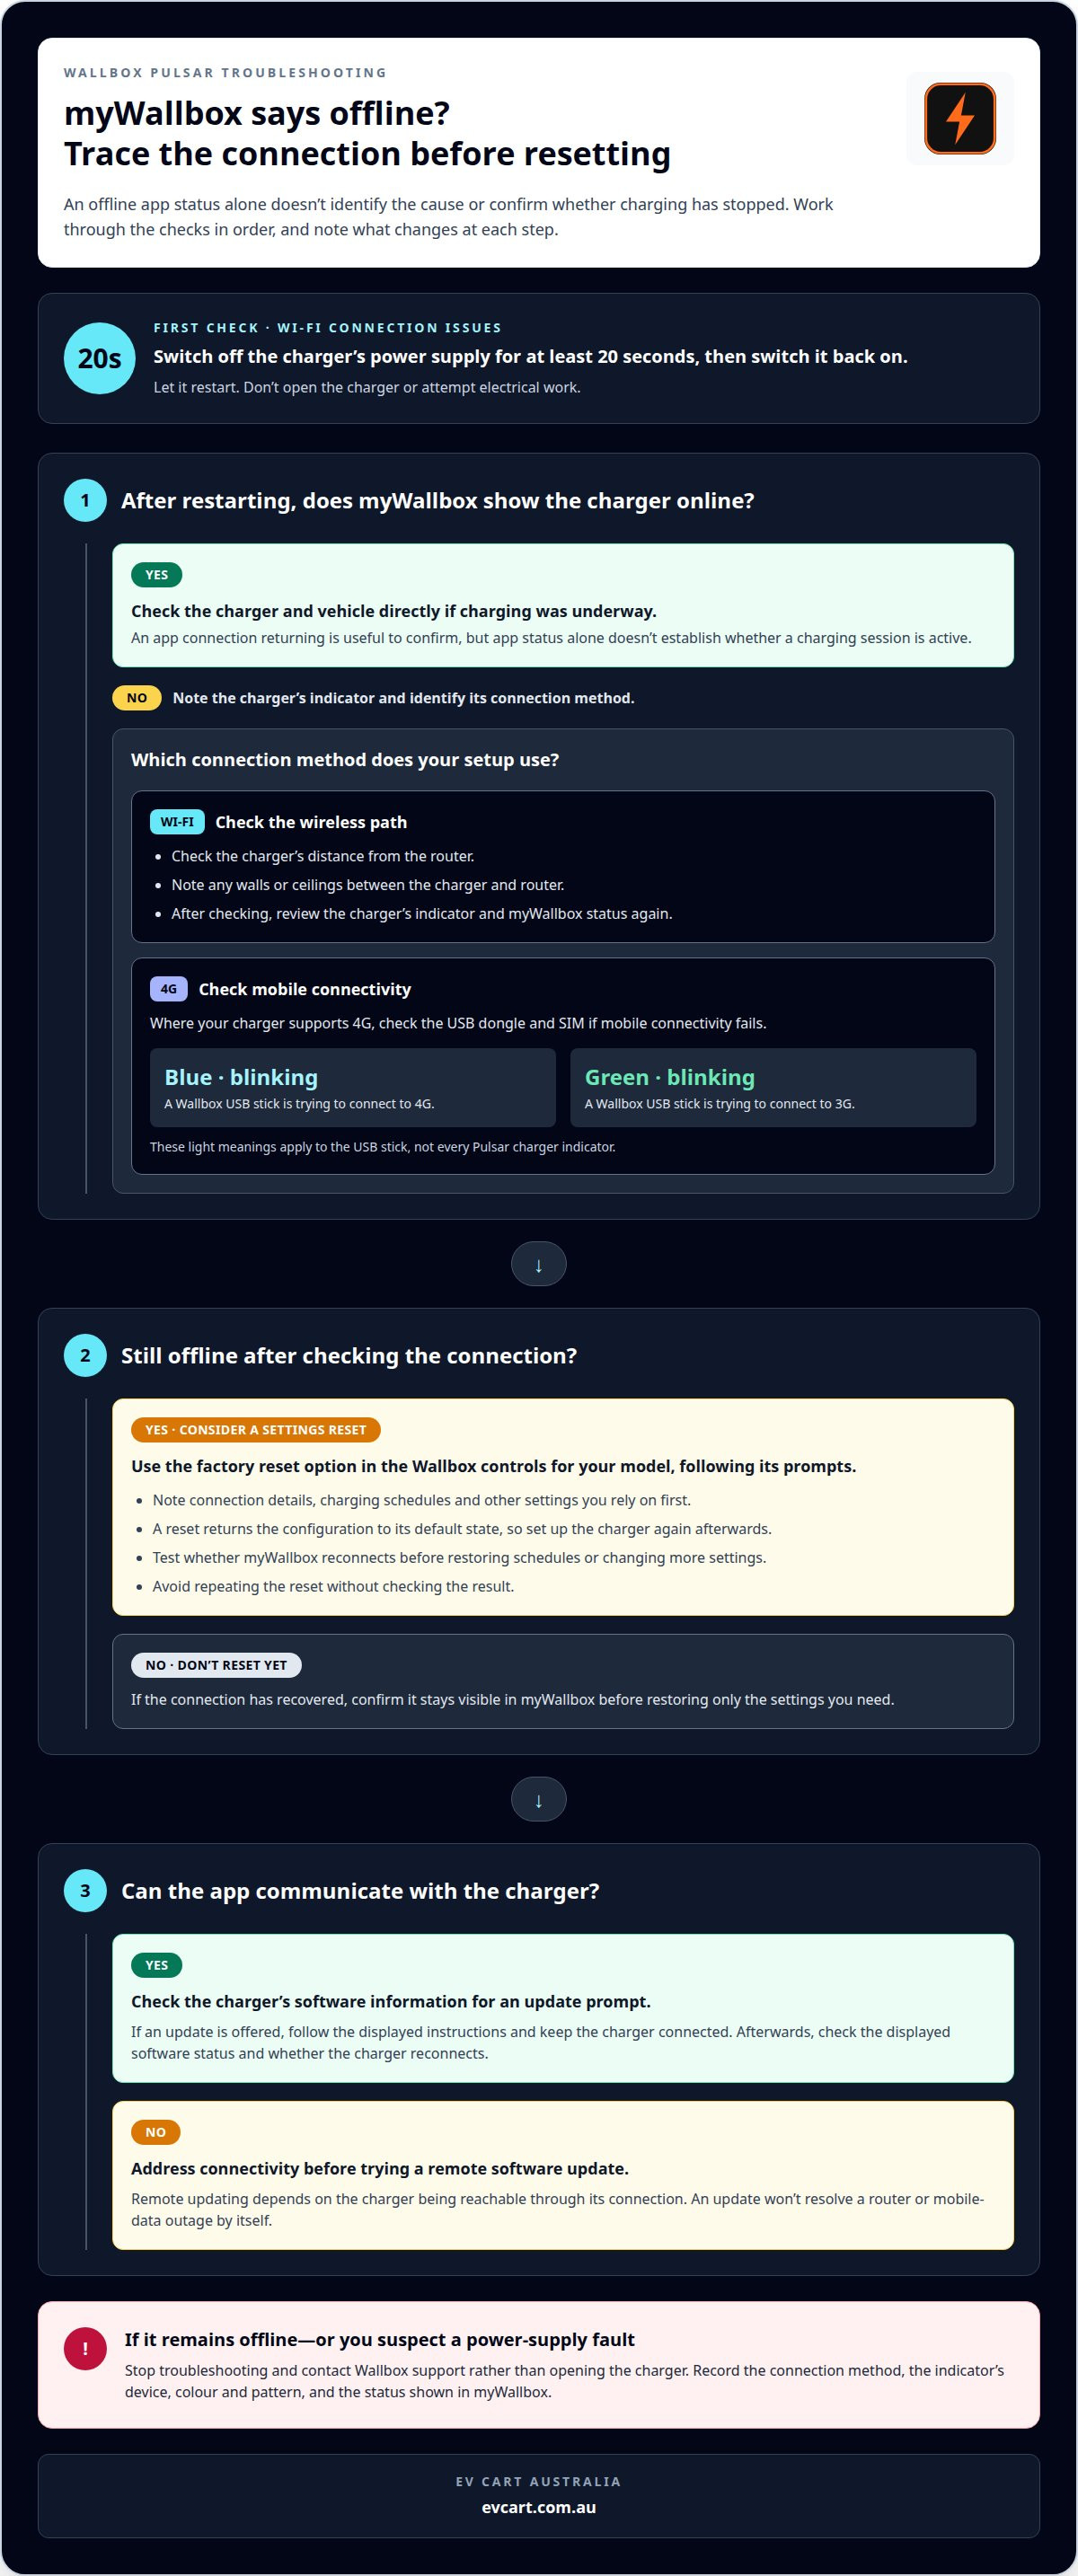
An offline status in myWallbox doesn’t identify whether the problem is the charger, Wi-Fi or mobile data. A practical Wallbox Pulsar offline fix starts with restoring the connection, not changing settings at random. For Wi-Fi connection issues, Wallbox recommends turning off the charger’s power supply for at least 20 seconds before restarting it.
It’s frustrating when the app can’t show your charger’s status, especially if you rely on it to manage charging. The right Wallbox Pulsar offline fix depends on how your model connects and where the connection is failing.
This guide explains how to power-cycle the charger, restore its connection, reset settings and update software. You’ll also learn how to reconnect through Wi-Fi or 4G where your charger supports it, and what to check if it still appears offline.
Key Takeaways
- For Wi-Fi connection issues, power-cycle the charger by switching off its power supply for at least 20 seconds before restarting it.
- Check the charger’s distance from the router and any walls or ceilings between them when diagnosing a weak Wi-Fi connection.
- Use the charger’s supported connection method, such as Wi-Fi or 4G, and check the USB dongle and SIM if mobile connectivity fails.
- Review the charger’s status light and the myWallbox app to help narrow down whether the issue is power, network access or the charger itself.
- Make settings resets and software updates a considered step, then reconnect the charger and check whether its app status has returned.
Table of Contents
Charger power cycling and manual restore
Start with a controlled power cycle, then check the charger’s local status and its app connection. This helps distinguish a connectivity issue from a problem with the charger’s power supply.
-
Power cycle the charger
Switch off the charger’s power supply, wait at least 20 seconds, then switch it back on. Wallbox recommends this interval for Wi-Fi connection issues. Don’t open the charger or attempt electrical work. Allow it to restart, then check its indicator and myWallbox status.
Note what happens before and after restarting: does the charger’s light change, and does the app still show it offline? If charging was underway, check the vehicle and charger directly rather than relying only on the app. An offline status in the app alone doesn’t confirm that charging has stopped.
-
Restore the charger manually
After restarting, open myWallbox and check whether the charger reconnects. Keep it powered while reviewing its status. If the app still shows it offline, note the connection method and any change in the indicator. Avoid repeating power cycles without checking the result each time.
Wallbox Pulsar Pro supports remote status checks through Wi-Fi or 4G. Its charging capability reaches up to 22 kW, but an offline connection affects access to remote management features. A lost app connection doesn’t, by itself, show whether a charging session is active. Check the charger and vehicle directly for current charging status.
A Pulsar may continue charging while offline if the session is available locally. However, remote status checks and app-based management require a connection. Check the charger and vehicle directly to confirm whether charging is underway.
If the charger remains offline after restarting and checking its connection, contact Wallbox support. If you suspect a power-supply fault, stop troubleshooting and describe the symptoms to support rather than opening the charger.
-
Check the Pulsar status lights
Check the charger’s indicator after it restarts, then compare any change with the app status. Don’t assume every flashing light signals the same fault. Note its colour and pattern, and identify whether the light is on the charger or a connected accessory.
If your setup uses a Wallbox USB stick, a blinking blue LED means it’s trying to connect to 4G. A blinking green LED means it’s trying to connect to 3G. These colours describe the USB stick’s mobile connection attempt, not a universal meaning for every Pulsar charger light.
When reporting the issue to Wallbox support, include which device the indicator is on, its colour and pattern, and whether myWallbox shows offline at the same time. This gives support specific symptoms to assess without guessing that a particular light confirms a fault.
Connection checks can help distinguish wireless access from charging output. The Wallbox Pulsar Plus is described as providing a maximum domestic single-phase charging power of 7.2 kW, while its product listing advertises 7.4 kW of single-phase power. Wallbox says Pulsar family chargers can charge up to 10 times faster than standard outlets.
Treat this as an estimate, not a live status check.
Factory settings and software updates
Use a factory reset only after simpler connection checks fail. Then review available software updates and confirm the charger’s connection before changing more settings.
-
Restore factory settings
Use the factory reset option in the Wallbox controls for your charger, following the prompts for its model. A reset returns the configuration to its default state, so you’ll need to set up the charger again afterwards. Before proceeding, note any settings you rely on, including connection details and charging schedules. Don’t reset repeatedly: first check whether the previous reset restored app access.
After resetting, follow the setup prompts and select the charger’s connection method. Confirm that it appears in myWallbox before recreating schedules or other preferences. If the app still shows it offline, avoid changing several settings at once. Record what you reset and the status shown, so the next troubleshooting step builds on a clear result.
-
Run remote software updates
Open the Wallbox app and check the charger’s software information for an update prompt. If an update is offered, follow the displayed instructions and keep the charger connected during the process. Don’t assume an update has completed just because the app is open. Afterwards, check the displayed software status and see whether the charger reconnects.
Remote updating depends on the charger being reachable through its connection. If myWallbox cannot communicate with the unit, address connectivity first rather than repeatedly requesting an update. The Wallbox gateway’s 3.2 firmware line includes an escalating Wi-Fi watchdog, which can restart a stalled Wi-Fi stack or reboot a hang. That specific firmware detail doesn’t establish that every Pulsar uses the same gateway software.
- Keep reset and update checks separate. First restore the default settings, then test app access before starting a software update. Doing both at once makes it harder to tell which change affected the connection. Note the sequence and results, including whether the charger appears online and whether its software status changes.
If a reset doesn’t restore access, revisit the connection method and app status rather than repeating the reset. A software update won’t resolve a router or mobile-data outage by itself. Keep the displayed error or status text available as you continue troubleshooting. This gives Wallbox support a specific result to work from, rather than a general report that the charger remains offline.
- After reconnecting, restore only the settings you need, then check that myWallbox still displays the charger. If you use scheduled charging, confirm the schedule is present before relying on it. For practical EV ownership gear, browse EV charging accessories.
Wallbox app access via Wi-Fi or 4G
Choose a connection method supported by your Pulsar model, then check each part of that route. Wi-Fi, Bluetooth and mobile data provide different types of app access.
- Check whether myWallbox can communicate with the charger over Wi-Fi. Wallbox Pulsar Plus has built-in Wi-Fi and Bluetooth, while Pulsar Pro supports Wi-Fi, Bluetooth, 4G and Ethernet. A Pulsar Plus showing offline over Wi-Fi needs a different check from a Pulsar Pro using mobile data.
Open myWallbox while your phone has internet access, then review the charger status. If the app works nearby over Bluetooth but not remotely, focus on the charger’s internet connection. If neither connection works, note the difference before moving to another step.
- Check the router’s internet connection, then consider the distance and obstructions between it and the charger. Wallbox recommends a maximum distance of 15 metres when one wall or ceiling separates them. With two walls or ceilings, or one wall and one ceiling, the recommended maximum is 5 metres.
For example, if a Pulsar is beyond two internal walls, test whether its Wi-Fi connection improves when the router is closer. Distance alone doesn’t prove there’s a fault. Record the router position and app status, then compare the result.
- If your charger supports Bluetooth, use it to check access nearby. The Wallbox app can manage charging sessions over Bluetooth when you’re nearby, while Wi-Fi allows remote app access. Comparing the two helps identify whether the issue affects local communication, internet access or both.
Stand near the Pulsar and open its status in myWallbox. If nearby Bluetooth access works but Wi-Fi access fails, check the home network route next. If the charger remains inaccessible nearby, note that before investigating the router.
- For a Pulsar Pro using 4G, check the mobile connection path. Wallbox 3G/4G troubleshooting includes confirming that the SIM sits correctly in its dongle and has data. A connection can also fail if the SIM is inactive, the dongle is damaged, its USB connector is damaged, or the dongle isn’t fully inserted.
Inspect the visible USB connection without opening the charger. Record whether the dongle is seated and whether myWallbox can show the charger remotely. Pulsar Pro also supports Ethernet; the socket version has Ethernet as standard.
- Match the connection test to the feature you need. The Wallbox app can show Pulsar Pro status remotely over Wi-Fi or 4G, while Bluetooth provides nearby access. A router outage affects Wi-Fi access; a mobile-data or dongle problem affects 4G. Keep the model, connection method and app result together when documenting the fault.
If your charger uses OCPP, include its internet connection and any disconnections in the diagnosis. OCPP troubleshooting also involves checking whether OCPP is enabled. These checks matter when the charger’s platform connection is at issue, rather than ordinary nearby app access.
Troubleshoot offline Wallbox Pulsar Plus in myWallbox app
For a Wallbox Pulsar offline fix, first distinguish an app display issue from a network failure. Check the app and available connection options before changing settings.
- Check whether myWallbox shows the Pulsar Plus as offline on every device you use. Close and reopen the app, then review the charger status again. Note the exact status and whether it changes. This helps distinguish a stale display from an ongoing connection problem.
Keep the charger selected while checking. If its status updates, record what changed. If it remains offline, move on to checking the network connection instead of repeating the same app action.
- Check that your home internet works, then confirm that the router is broadcasting Wi-Fi. If other devices can’t reach the internet, troubleshoot that connection before assessing the charger.
Consider the route between the router and charger. The distances of 15 metres and 5 metres sometimes stated as recommended maximums are not verified here, so don’t rely on them as guidance for your setup.
- If Bluetooth is available for your setup, compare nearby access with remote access. Stand near the Pulsar Plus and check its status in myWallbox using Bluetooth. This may help distinguish nearby communication from internet access.
If nearby access works but remote status fails, focus on Wi-Fi and internet access. If neither works, record both results. This comparison helps identify whether the issue affects remote access, local communication or both.
- If the Pulsar Plus went offline after an outage, check for an internet disconnection. The gateway maintainer advises checking the reset reason after an outage. This can help distinguish a power issue, a crash or a Wi-Fi failure.
Record when the outage occurred and the reset reason, if available. Compare that information with the app and Wi-Fi results. Don’t assume the outage caused the fault just because the timing matches.
- Check OCPP settings only if your Pulsar Plus uses OCPP connectivity. Wallbox OCPP troubleshooting includes checking the internet connection, disconnections and whether OCPP is enabled. These checks apply to OCPP, not every offline status in myWallbox.
Note whether OCPP is enabled and whether network interruptions coincide with the offline status. If the charger uses ordinary app access, focus on Wi-Fi, Bluetooth and the router connection. This Wallbox Pulsar offline fix narrows down the issue by testing one connection path at a time.
What do the Wallbox Pulsar status light colours and flashing patterns mean?
Identify which indicator is flashing before interpreting its colour. A Wallbox USB stick has distinct blue and green meanings, but those meanings don’t apply to every Pulsar light.
- Check whether the flashing light belongs to a USB stick or the charger itself. Identify which device is showing the light, then note its colour and whether it stays steady or blinks. This distinction matters because the known blue and green connection signals relate specifically to a Wallbox USB stick.
For example, record “USB stick, blinking blue” rather than just “charger flashing”. That description gives you a specific observation to compare with the connection method and myWallbox status.
- If the Wallbox USB stick blinks blue, read this as an attempt to connect to 4G. A blinking green LED means the stick is trying to connect to 3G. These patterns describe an attempted mobile connection, not confirmation that the charger is online.
Compare the light with the selected connection method. If the USB stick is blinking blue while the app shows offline, note both details. Don’t interpret the blue light as a successful 4G connection.
- Record the sequence if the USB stick changes between colours or flashing patterns. Note the order, whether the light pauses, and what myWallbox displays at the same time. For instance, write down whether the app remains offline while the stick attempts 3G or 4G.
Use the observation to focus later checks. A blinking green light points to an attempted 3G connection; it doesn’t identify why that attempt hasn’t connected. Keep the description factual rather than assigning a fault based on colour alone.
- Distinguish the USB stick’s mobile signal from the Pulsar charger’s own status indicator. The USB LED meanings above don’t establish a universal colour key for Pulsar models. Don’t assume a charger light means the same thing as a dongle light.
When checking a Pulsar Plus, compare its indicator with myWallbox and nearby Bluetooth access. For a Pulsar Pro using a USB stick, record the dongle’s colour separately. This avoids confusing the charger’s status with mobile connection activity.
- Give a clear report of the light when continuing troubleshooting. Include the device, colour, whether it’s flashing or steady, the connection method and the app status. “USB stick blinking green, myWallbox offline” is more useful than “the light looks wrong”.
If the light is on the charger rather than a USB stick, describe what you observe without assuming what the colour means. Include the model and connection results. A precise report helps distinguish a mobile connection attempt from the charger’s separate status.
EV Cart Australia
EV Cart Australia offers EV accessories for practical electric vehicle ownership. Choose accessories with your vehicle and intended use in mind, and review the fitment details before purchasing.
After working through the connection checks, note your charger model and the troubleshooting steps you completed. This record can help you pick up where you left off if the issue returns.
For help with EV accessories, contact EV Cart Australia.
Keep your charging setup ready for the next drive
Once the connection is restored, keep a simple record of the app status, charger model and connection method in case the issue returns. These details can help distinguish a network interruption from a charger fault and explain what you’ve already tried.
A Wallbox Pulsar offline fix addresses connectivity, while the right EV accessories can support other aspects of everyday ownership. Choose accessories for your vehicle and intended use, and review compatibility information before deciding. EV Cart Australia offers EV accessories, not charger repairs or electrical work.
If you’d like help with EV accessories, contact EV Cart Australia. Take the next step that fits your setup, and get back to charging with a clearer plan.
Frequently Asked Questions
How do I reset or reboot a Wallbox Pulsar without losing charger settings?
Power-cycle the Pulsar rather than selecting a factory reset. For Wi-Fi connection issues, Wallbox recommends turning off the charger’s power supply for at least 20 seconds, then restoring power. A factory reset is a separate action that restores default settings, so avoid it if you want to retain your configuration. After restarting, check the charger’s status in myWallbox and confirm your usual settings remain in place.